Friday, February 27, 2015

cheesy orzo with broccoli and bacon

Tonight for dinner we had salmon, which we usually make with baked potatoes, however, salmon takes like 5 minutes to cook and potatoes take an hour in the oven. We also didn't really have good potatoes soooooo I had to improvise something. We are in desperate need of food so I was kind of limited in my options. Enter that Betty Crocker app Jacque told you about last week. I entered orzo and broccoli and didn't really get anything, so I took off the broccoli and started scrolling through the orzo recipes until I stumbled on this one. I did not have the right vegetable (asparagus) or cheese so I decided to make up my own version and here it is:


cheesy orzo with broccoli and bacon

4 slices of bacon
chicken broth (14 ounce can)
1 cup uncooked orzo
half a bag of frozen broccoli
1/4 cup roasted red bell peppers (optional)
1/2 (or more) cup shredded cheese


Assembling the mise en place for this one is fairly easy. First you need to cut the bacon into strips. I usually do this by layering all the bacon together and then cutting it with scissors directly into the pan once it is hot, or a small bowl. You will also need to do a rough cut on your roasted red peppers. I had some left over from a previous recipe so I was happy to add these guys in, but if I didn’t have them already I would have just left them out.

Start out by placing a nonstick skillet over medium heat. Once that gets hot you’ll add the bacon and cook until it is nice and crispy.


Set your bacon aside and clean out your pan, or get a new one. I used a stainless steel pan and not a nonstick one because that’s what we have and I needed my nonstick for the salmon.

Add chicken broth to your pan and get that to a boil. Add the orzo, reduce to simmer and cook (covered) for five to seven minutes.

Add half a bag of frozen broccoli and the roasted peppers. Cook until the orzo is al dente.  I’m not really sure how long this took, I was too busy cooking my salmon. After my salmon was finished, roughly six or so minutes later, I tasted the orzo and it was under and the liquid had all cooked out. So I added some more chicken stock and cooked for another eight (maybe?) minutes. Basically you will want to keep an eye on this and you might have to bump the heat up closer to medium.


Once your orzo is cooked, add in your desired amount to cheese and give it a good stir. Garnish individual servings with bacon and serve with whatever you have going (for me this was salmon).

I hope you enjoy. Hit me up in the comments if you want to know how we cook our salmon. Here’s a tasty sneak peak look. MMMMMMmmmmm, salmon.

Tuesday, February 24, 2015

top four winter skin essentials (mary kay sponsored post)

Hi all!!! Well I don’t know where all of you are located around this lovely continent we live on but I am guessing most likely you are cold, like me. This winter has been outrageous. I am sick of it. It wreaks havoc on my nails (they are so dry if I look at them they spilt I swear…), makes my head itch like crazy and, of course, dries out my skin! So today I’m going to share with you some of my favorite Mary Kay winter skin savers! This time of year is all about removing the dry, flakey, dead layer and moisturizing the new!

First of all, your science lesson for the day: WHY does skin get dry? Oil that is naturally produced from the skin is what keeps it soft and moisturized. Hot baths, low humidity and dry climate strip the oils from the skin and leave it feeling dry and itchy.

MOISTURIZATION IS ESSENTIAL!!

We have a few things products that I would like to highlight that will help replenish that moisture and get you back to feeling good.


At only $22 this is a cheap lifesaver for dry skin. It is an amazing formula that dries to the touch so you can sleep in it or wear it around the house on cleaning day. It helps de-stress skin, de-puffs skin and reduces the appearance of pores. And it hydrates and locks in moisture. Your skin feels amazing after you use it.
 

These little babies are at the top of the line when it comes to adding moisture back. They are $32 each and sssoooo worth it. A little goes a long way. I can usually get through about two winters with one jar.

The purple one is for oily skin. It’s a smooth gel that doesn’t clog pores yet provides moisture for oily skin. (This can be tricky for oily skin. The pores are usually larger and therefor get clogged easier with a heavy cream causing more breakouts.)

This pink is for us dry people. It is so thick you can take the top off the jar and shake it up and down and it will not move. It is the ultimate moisturizer.

They both hydrate for up to ten hours leaving skin feeling soft and locking in that essential moisture. Love. Love. LOVE!!

Now let’s talk about lips. I work in an office four days a week and I talk on the phone most of the day so my lips gets dry. Enter SATIN LIPS!!


This little two step duo is pure magic. First you use the lip mask to scrub off the dead skin and then use the balm to keep those lips moisturized for at least six hours! I don’t know about you, but I never got into the whole chapstick thing, putting it on a million times a day only to have your lips STILL be dry, forget that crap. This is just a million times better. I love to use it before bed a few times a week and I never have chapped lips, even in the coldest weather. The set is only $18, I have spent that on an okay lunch at Applebee’s. Such a deal!!!

So there are my top four picks. I hope that I helped you and you considering adding a few of these goodies to your routine. We also have other options as well so contact me and I’ll find you a perfect fit, at a great price.

Thanks! Stay Warm!

Robyn
Monday, February 23, 2015

lost sole

Up until Christmas Miles had one pair of shoes. The very first "real" shoes that we bought for him. A shiny pair of Stride Rite's that I dropped almost forty dollars on. For Christmas, my grandmother, Miles' Gigi, bought him a second pair of shoes from Carter's. They light up and everything but they aren't really "good walking shoes," they are more play shoes.

A few weeks ago we lost one of Miles' Stride Rite shoes somehow. Once I realized it I even went back to the last store we went to and checked the parking lot and asked the workers. No luck. I almost cried. These were the first shoes we bought Miles once it was clear that walking was imminent. There have only been a few things I've gotten sentimental about regarding Miles and "growing up". I was surprised at how hard this hit me. 

But alas, time to find some new, good shoes for Miles. When we were out and about I decided to go to Walking Tots last Friday since we were in the area after some mommy pampering. We spent maybe 30 minutes in the store and were helped by an associate and the owner (I can't remember their names). I learned a lot about good shoes for kids and why they are important. 

In the end I narrowed down my decisions to these two pairs of shoes.


I let daddy make the final decision and he picked the Sperry's. I think they are pretty awesome and was also told that they are "fly". I would have bought both pairs but wasn't really ready to drop $80 on shoes for my 16 month old.

Tonight though I packed up Miles' remaining Stride Rite shoe and placed it in the closet. Kind of like the end of an era. Tear. 


What got you misty eyed about your little one or ones growing up?
Friday, February 20, 2015

sriracha ranch chicken

Hi it’s Jacque again! This is another one of my recipes that has kind of evolved from suggestions from my husband and combining some things I’ve seen on TV or on the Internet. I tend to get an idea in my head of what I want to do but I don’t know exactly how to accomplish my end goal so I search for recipes online and combine what I like from a few to make my own.

On a side note if any of you haven’t downloaded the Betty Crocker App you should stop and do that right now… It’s okay I’ll wait… Seriously just do it :) It is a lifesaver for me when I need to come up with dinner and don’t have any ideas. My favorite part is the recipe search where you can tell it what you have in your fridge (let’s say leftover turkey and frozen peas) and it will give you a list of meals or side dishes that you can make with those ingredients. It really does help me think outside of the box and not make the same 5 things over and over…

Okay back to our chicken!


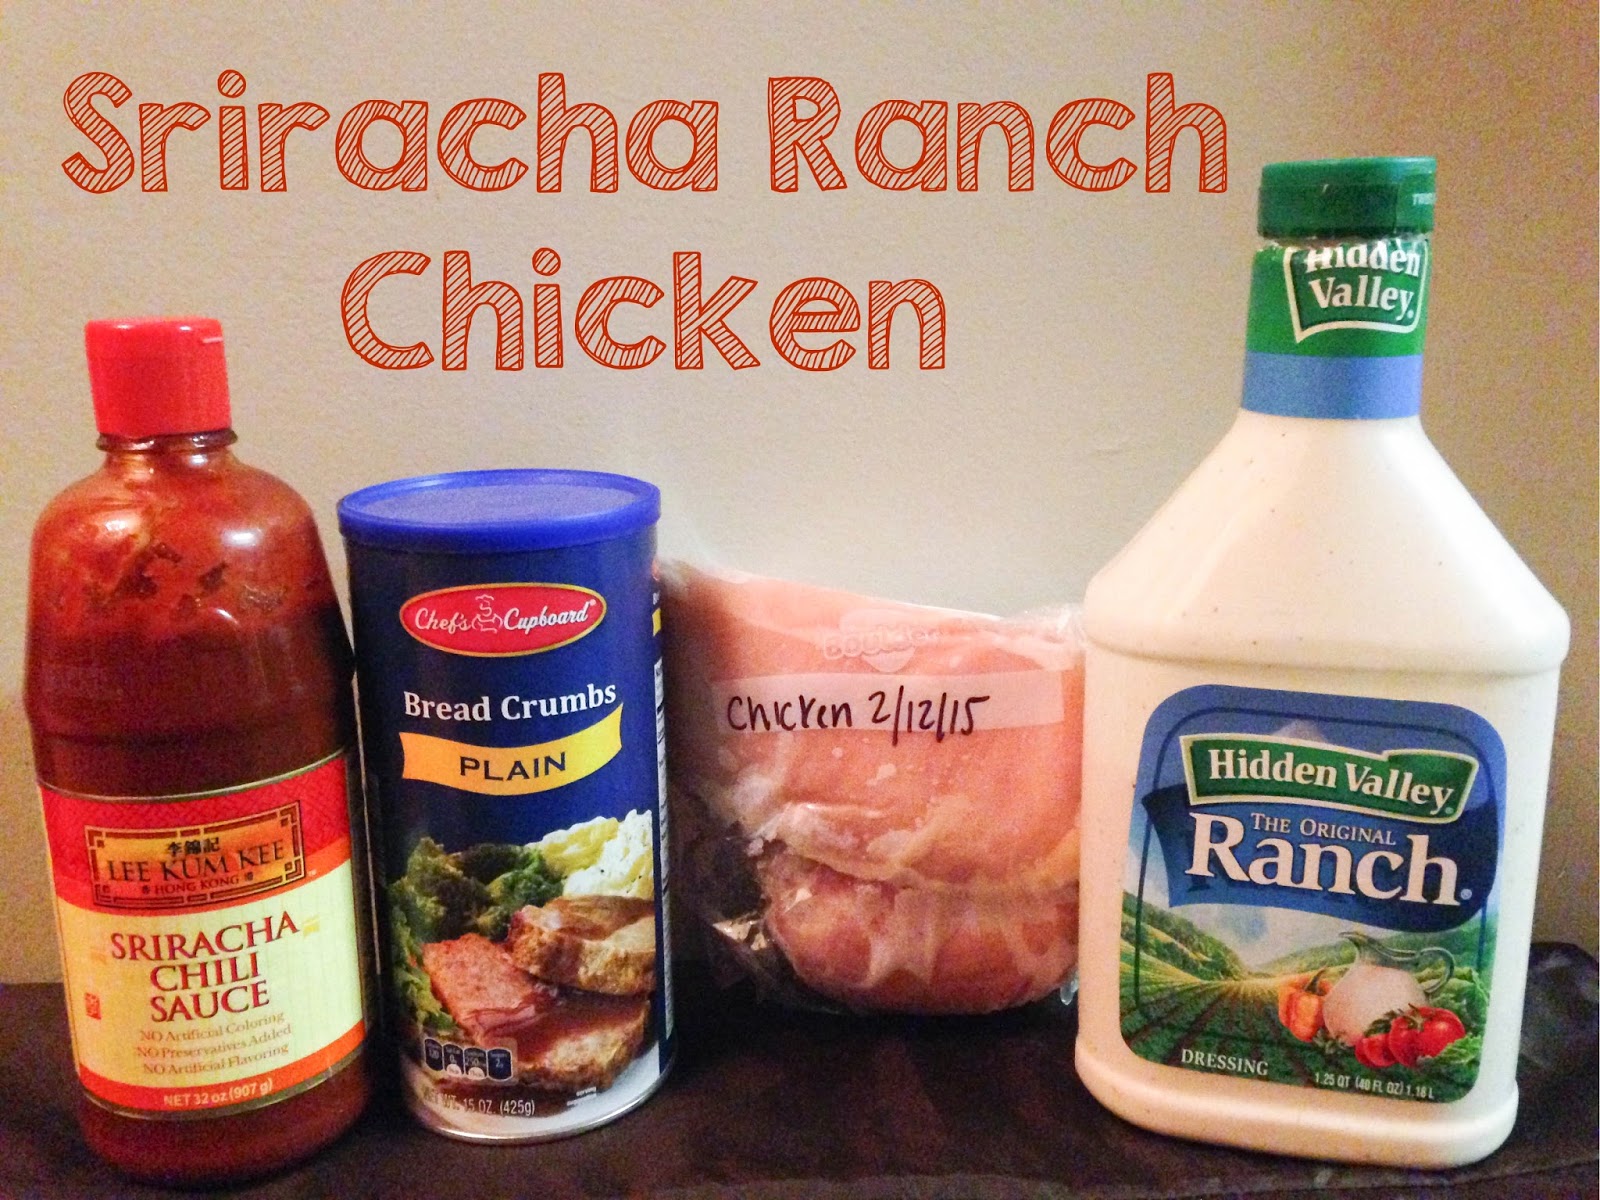
Sriracha Ranch Chicken

Ingredients:
3 thawed boneless skinless chicken breasts cut into ‘tenders’
1 cup of ranch dressing
Sriracha to taste (about a tablespoon)
2 cups Bread Crumbs

1. Line a cookie sheet with tin foil and spray it with cooking spray so the chicken doesn’t stick after its cooked and preheat your oven to 350 degrees.

2. Next set up your breading stations. First make your ranch/Sriracha mixture. I don’t typically measure but I would say put about a cup or ranch dressing in a bowl and then start adding Sriracha according to how spicy you want your chicken. I would say a tablespoon would be a good amount for the average taste buds, you want it to be enough to make the ranch dressing a light red color.

*** if you want to make some chicken without any Sriracha for children or someone who doesn’t like spicy foods do not add the Sriracha in yet and just put your ranch in a bowl.

3. For this amount of chicken I would say you need about 2 cups of bread crumbs (again depending on how big the chicken breasts were to begin with). You can use any type of bread crumbs for this. If you use Italian flavored bread crumbs you can use them straight from the box. If you are using plain bread crumbs I typically will add salt, pepper, garlic powder, onion powder, paprika and parsley (Side note parsley goes good with chicken but if you add too much it turns the bread crumbs too green and when the chicken cooks it is not an appetizing color, although it still tastes great).

***If you don’t have bread crumbs, which I typically don’t, just make your own. You can make bread crumbs out of anything and everything. I’ve used Ritz crackers, saltine crackers, pretzels, cheerios, Chex cereal, Rice Krispies and many combinations of any of those. The easiest way is to put whatever ingredients you are using in a small food processor and blend them up with the same spices you would have added to the plain bread crumbs. You seriously can’t mess this up and I haven’t made a bad batch of bread crumbs yet (except for maybe the too green parsley ones). A money saving tip I use is to take any cracker or plain-ish cereal that is going stale into a ziplock baggie or air tight container in the pantry. I just mix them all together in a gallon size bag and when I need some bread crumbs for something I just dump out what I need, blend them up and put the rest back in the pantry…I digress.

4. Now it is time to start breading your chicken. At this stage if you are making some without Sriracha decide how many you will be making not spicy and start with those pieces of chicken first. Try to handle the chicken only with one hand if you can, it makes the clean-up process a little easier and you will touch less things with your raw chicken fingers. Take a chicken tender and coat it liberally in the ranch dressing (let it be pretty thick - no need to scrap any off, I did this the first time and my chicken wasn’t as juicy or as flavorful). Next roll it around in the bread crumbs until all sides are nicely coated and then lay it on your cookie sheet. Continue doing that until all pieces are done. If you run out of ranch or dressing just wash your hands and get some more, no biggie.

***If you are making some spicy and some not, once you are finished with the not spicy pieces wash your hands and add your Sriracha into the remaining ranch dressing. Use enough to color the dressing light red but don’t taste it obviously because you have had raw chicken in there! Doing it this way means you don’t have to dirty two extra bowls since the Sriracha will come off in the bread crumb bowl and you don’t want spicy bread crumbs on your non-spicy chicken.

5. When you have finished all your chicken put your tray into your oven that should be at 350 degrees. Cooking times will vary depending on your oven and how thick your chicken is. You want to flip the chicken halfway through the cooing time (about 15 minutes in) and then cook until the chicken has reached a minimum internal temperature of 165 degrees. For the size chicken I typically use my cook time is approximately 25-30 minutes. If you don’t have a meat thermometer it is a really good investment to make in your kitchen. If you are anything like me I overcook every meat I ever make. You can buy a thermometer relatively cheap and you don’t ever have to worry about over (or under) cooking anything ever again.

And that’s it! This chicken is really awesome, when cooked right it’s juicy and really flavorful and the spicy kick is just right. It tastes wonderful without the Sriracha as well because the ranch dressing really does a good job flavoring the chicken and keeping it juicy while it cooks. Stay tuned for some more of my recipes next time Holly lets me guest blog ;)
Wednesday, February 18, 2015

maybe I’m not ready for this whole mom thing

So, today, or more specifically, this afternoon did not go according to plan. The plan was to come home, start dinner, grab Miles, run to the store and then hit the Children’s Museum with friends.

I came home and totally forgot to start dinner, packed up Miles and headed to the store. Then I remembered about this park I wanted to take Miles to, so we did that. Then I remembered that whole dinner thing so we abandoned our shopping trip and went home to make dinner.


To keep Miles occupied I gave him some containers and a spatula to play with and started assembling dinner (my version of 8 can taco soup).  While I was opening all my cans, Miles grabbed a ladle out of the drawer (yeah he can reach those now) and then started scooping cat food from the bag onto the floor. I’m still assembling dinner and now Miles is ladling water from the cats water bowl. Ok, fine, whatever, he’s busy.

As I’m pulling apart the rotisserie chicken for the soup I see Miles pick up the water bowl (a large Corelle cereal bowl) and then unceremoniously DROPS. IT. ON. THE. FLOOR. It shattered. EVERYWHERE. I scoop him up, grateful that he was still wearing his shoes, and go back to shredding chicken.


After I finish and set the crock pot I empty the pack’n play of toys and then toss him in and listen to him cry. I snap a pic of the disaster, text my husband, sister and girlfriend. She asks if I need help and I start crying and text back a yes.

Enter mini Mommy meltdown. I contemplated just sitting on the floor in the kitchen until the cavalry arrives, but I compose myself and start to clean up while Miles tries to escape from the pack’n play. She arrives and then we clean up and hang out for a while.


But before she got there and Miles was crying and I was just staring at the mess on the floor I totally thought, “maybe I’m not ready for this whole mom thing.” It was fleeting and brief, but I still had it, and I’m sure I’m not the only one. So, in case you are having a crappy Wednesday, just so you know, you aren’t alone. It gets better and sometimes you have to call in the reinforcements and support and not feel bad about it.
Tuesday, February 17, 2015

DIY color sorter

So if you are anything like me (slightly neurotic and a tad OCD) you may be prone to holding on to things or supplies. However, I'm not really sentimental with personal items. I think I have one small box of items from high school including photos, and I've even thought about getting rid of it because I have no idea what to do with the stuff. But I digress. 

Anywho...Miles LOVES those baby food pouches and big kid applesauce pouches. Like loves them loves them. Inhales them. It's a-dorable. You would think with the 3000 some pictures of him I would have one with him eating one of these pouches but...no. 

Within the last few weeks I've started collecting the lids. Why? I had no idea until today. I've keeping them in a jar by the sink. I should note that you should clean/rinse them before keeping. 

I decided to make a color sorter for Miles. This is obviously a "with supervision" toy as the caps are very small. I spilled out my lids to see what colors I had. 


As you can see there are FIVE colors. Red, yellow, green, blue and purple. But more on that later. I went around the house gathering supplies. I found this Christmas gift box in the spare room closet. 
I decided to cover the box to make it less
"Christmasy". I used some left over wrapping paper form our Valentine's day photo shoot. It is very difficult to wrap a box with the lid off. I also only could find blue painters tape so the wrap job looks less than perfect. I'm also not firing on all cylinders with this stupid cold. 

I used a piece of sturdy white paper to make the sorter. I covered the lid with paper so I can still use the lid and keep all the caps inside the box without fear of losing them. I used my hole punch to cut out FOUR holes and then I colored a ring around each hole and wrote the color name. Are you figuring out what happened yet? 

When I was coloring around the rings I realized that I had FIVE colors. Oh well,  I guess I will have to wait until I find a sixth color and make a new box. 

Tada! What toys have you made for your little ones?
Tuesday, February 10, 2015

how to fix picture quality on night vision baby monitor


We have the Withings baby monitor and we LOVE it. It has an app for the iPhone (and I think Android phones) so I can check it wherever I am. You can also check it online through their website. It has alerts and you can adjust those to your specific preferences. It plays music and has a night-light.

The downside? The night pictures are horrible! As my aunt asked "what's with the paranormal activity?" We initially thought nothing of it and assumed that was just the quality of a night vision camera. Then one day we took our downstairs surveillance camera upstairs and put it in Miles' room to see what the quality was like there. We were amazed at the quality...in the old camera. WTF? How does this new camera make the old one better? It took my husband a few minutes of thinking before he realized that the downstairs camera has more infrared LED’s than the baby monitor. After some looking around on Amazon we found this (you will also need this). The difference is like night and day now.

Here is a screenshot with the light in the room turned on (it’s still black and white because there is not enough light for the camera to switch to color).


Here is the screenshot of the Withings camera by itself.

And here is the screenshot with the IR LED illuminator.


Amazing right?